Anonymizer Anonymous Surfing 6.0™ Help
Please refer to the instructions below to best utilize our
latest release of Anonymous Surfing.
Introduction
Anonymizer® Anonymous Surfing™ protects your identity when you surf
the Internet with easy, one-click privacy. It prevents snoops and spammers from
gathering your personal and confidential information. Anonymous Surfing also
defends you against the latest pharming, phishing, and evil twin scams.
Set it and forget it - simply turn on Anonymous Surfing automatic protection
when youâre online. Once itâs activated, Anonymous Surfing redirects
your Web traffic through our secure servers and hides your online identity.
For even stronger protection, you can also enable Surfing Security™ SSL
Encryption, which creates an encrypted “virtual tunnel” from your
computer to the Anonymizer network. This shields you from the most sophisticated
methods of online spying and snooping and is a must-have for anyone utilizing
a wireless network.
Control Panel - Using
Anonymizer Anonymous Surfing
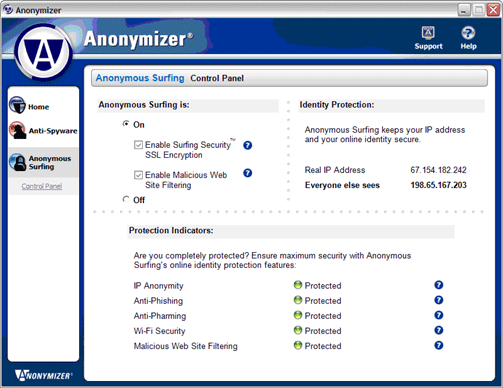
On
Clicking “On” hides your IP Address and protects you from phishing
and pharming scams.
Enable Surfing Security?
Checking the box to “Enable Surfing Security” allows you to surf
in a secure, encrypted "tunnel" from Anonymizer to your PC. Surfing
Security uses powerful 128-bit encryption, similar to that used by online banking
sites.
Back to Top
Enable Malicious Web site Filtering
Checking the box to “Enable Malicious Web site Filtering”
turns on special filtering which will warn you of potentially
hazardous Web sites. Spyware and other malicious software
can use ActiveX and Java to compromise your system and
personal information. Anonymizer maintains a list of Web
sites known for malicious code infections.
Off
Clicking “Off” disables Anonymous Surfing.
IP Hiding
Your IP address can be tracked when you surf the Internet. Itâs like Caller
ID on the Web. This section displays your real IP address and the anonymous
IP address that is visible to Web sites when Anonymous Surfing is active.
Back to Top
Protection Indicators
These red and green indicators provide your privacy protection status at a glance.
So itâs easy to determine if Anonymous Surfing is on and you are protected.
IP Anonymity - When this indicator light is green,
your real IP address is hidden from Web administrators and online snoops as
you surf the Internet. By shielding your IP address, people are unable to track
your Internet activities and build profiles on you.
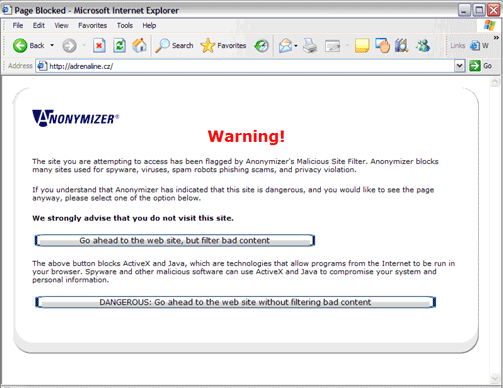
Anti-Phishing
- When this indicator light is green, your Anonymizer
anti-phishing protection is active. If you click on a
link in an email that takes you to a known phishing site,
Anonymizer will alert you to the danger by displaying
a warning page. If you wish, you may proceed to the site
by clicking the “Continue” button on the page.
This is not recommended because many phishing sites may
also infect your computer with spyware. Please visit our
Threat Center to
learn more about phishing
scams.
Anti-Pharming
- When this indicator light is green, your Anonymizer
anti-pharming protection is active. Anonymous surfing
protects you against Hosts file pharming and DNS cache
poisoning to ensure that every URL typed into your browser
takes you to the legitimate Web sites. Please visit our
Threat Center to
learn more about pharming
attacks.
Wi-Fi Security
- When this indicator light is green, your Anonymizer
wi-fi protection is active. Anonymous Surfing uses 128-bit
patented “Surfing Security” SSL encryption
to secure the data that you send over a wireless connection
and protect you against the latest evil twins scam. Please
visit our Threat Center
to learn more about evil
twins.
Malicious Web site
Filtering - When this indicator light is
green, your Anonymizer malicious Web site filtering protection
is active. Spyware and other malicious software can use
ActiveX and Java to compromise your system and personal
information. When you try to access a site that has been
identified by Anonymizer as dangerous, your browser will
display a warning page. You may proceed from this page
to the site, with an option to filter out the potentially
malicious content.
Back to Top
Support - FAQ:
How can I use Anonymizer with my firewall program?
Youâll need to set your firewall to permit anonymizer.exe
and anonproxy.exe to access our servers, or Anonymizer will
not function properly. For specific settings for popular
firewall programs,
click here.
I keep getting a “Cannot detect Internet connection”
message. What should I do?
This may occur if you do not have an Internet connection or your firewall is
blocking our program from detecting a connection. Please check that your Internet
connection is working.
I keep getting a message that you can't authenticate
me with your Privacy Network.
Please try exiting the program and your browser, or restart your computer.
If you continue to have difficulties, please call us at 888-270-0141 or 858-866-1300
for assistance Monday through Friday, 7:30am-5:00pm PST.
Why do I keep getting the following message: “Account
Not Authorized?”
Please make sure you are logging in with the correct username and password.
If you continue to have difficulties, please call us at 888-270-0141 or 858-866-1300
for assistance Monday through Friday.
What happened to the Internet Explorer toolbar?
The Internet Explorer toolbar control for Anonymous Surfing is being updated
for maximum protection and will be included in an upcoming version.
Back to Top
Firewall
Settings
If you have a firewall installed on your computer, you
will need to set it to permit Anonymizer software to access
its servers. In this section youâll find help for:
Permission dialog screens: These are the dialog
screens that your firewall program shows you when youâre
first installing and running new software. Youâll
ensure that your Anonymizer software will run properly
by permitting it access to the Internet through your firewall.
Configuration setting screens: If permission wasnât
granted through the firewall using the dialog screens
when Anonymizer was first installed, you will need to
make the necessary changes on the configuration setting
screens of your firewall.
If you donât use these popular brands, it still
may be helpful to review these screens for similar permission
settings for your particular firewall.
Back to Top
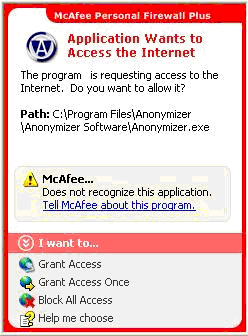
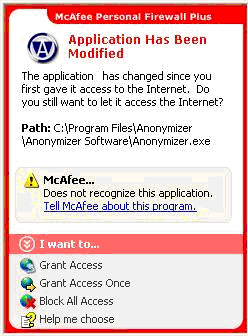
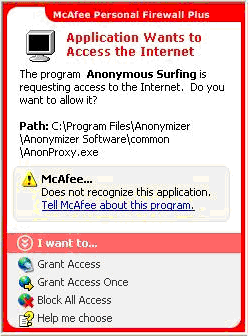
McAfee Personal Firewall
Permission Dialogue Screens
If you use McAfee Personal Firewall, you will likely see these three dialog screens in this order when you first run Anonymizer. Be sure to select "Grant Access" in the "I want to
" section of the dialog.
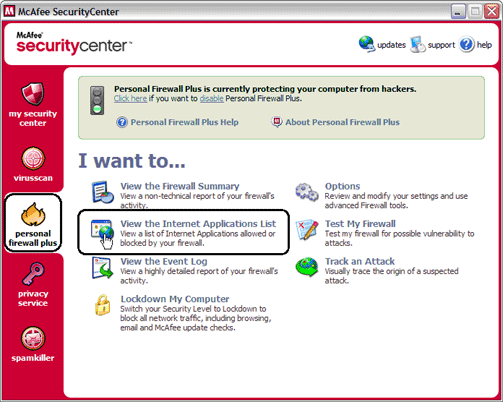
Configuration Setting Screens
Open your 'McAfee Security Center'. Click on 'Personal Firewall' on the left, and then click on 'View the Internet Application List'.
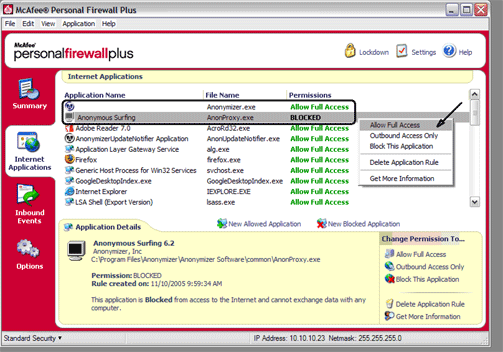
For all 'Anonymizer' applications simply right click on the name and select 'Allow Full Access'.
Back to Top
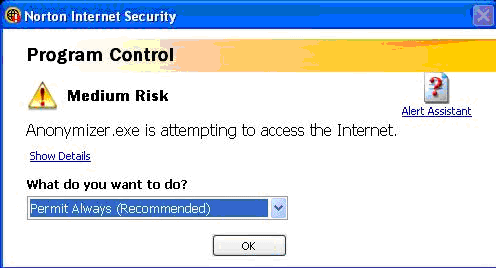
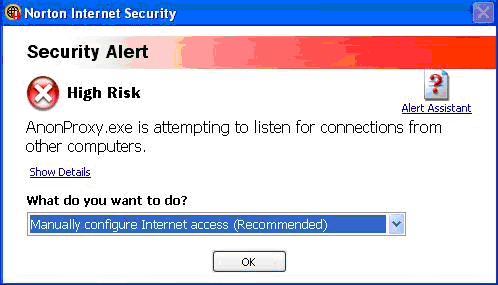
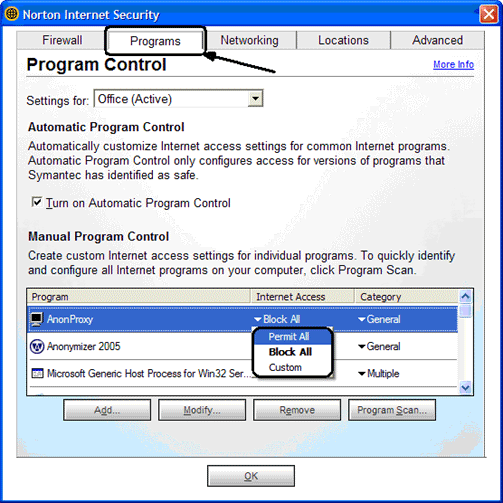
Symantec - Norton Internet Security firewall
Permission Dialogue Screens
If you use Symantec - Norton Internet Security firewall, you will likely see these dialog screens in this order when you first run Anonymizer. Be sure to select "Permit Always (Recommended)" in the "What do you want to do?" menu of the dialog screen.
Configuration Setting Screens
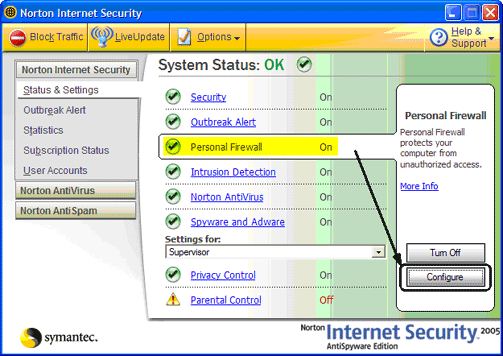
Click on the 'Programs' tab at the top. At the bottom find the AnonProxy and Anonymizer 2005 applications, left click on the rule that says 'Block All or Custom' and change it to 'Permit All'. Do this for any and all Anonymizer programs. Click 'OK' and you should now be able to use the Anonymizer software.
Back to Top
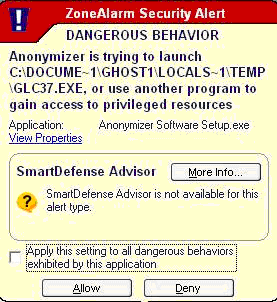
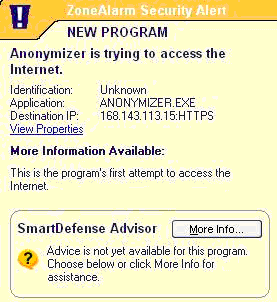
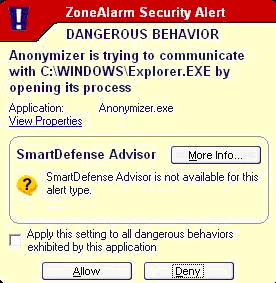
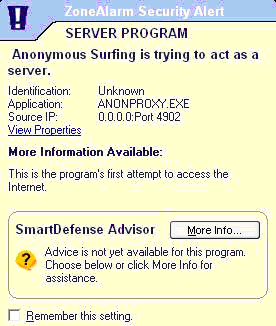
ZoneAlarm Firewall
Permission Dialogue Screens
If you use ZoneAlarm Firewall, you will likely see several screens like those below when you first run Anonymizer. Be sure to select the "Allow" button and check the box so that the setting is retained.
Configuration Setting Screens
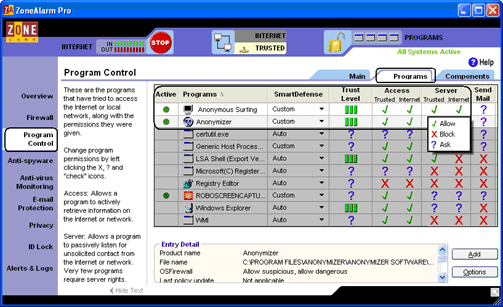
Windows Firewall
Permission Dialogue Screens
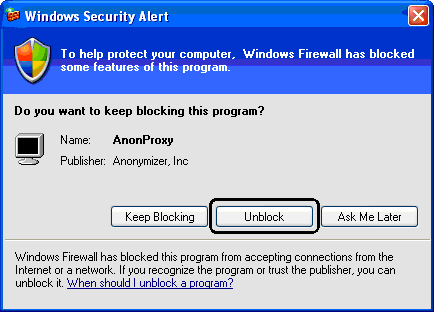
If you use the Windows Firewall, you will likely see the following dialogue
screen. Be sure to select "Unblock" on the Windows Security Alert.
Configuration Setting Screens
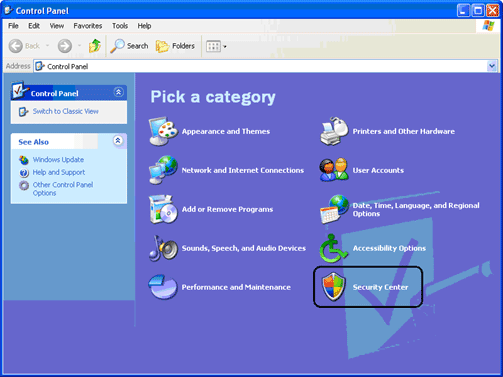
To 'Add' or 'Allow' Anonymizer applications within your 'Windows Firewall' please go to your 'Control Panel' and click on Windows Firewall or Security Center.
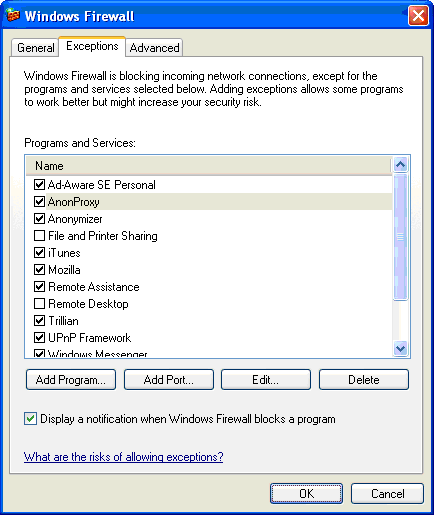
Click on Exceptions at the top tab. Select ALL Anonymizer software and check the small box on the left to allow them to the Firewall. If you do not see anything listed for Anonymizer, please follow to the next step.
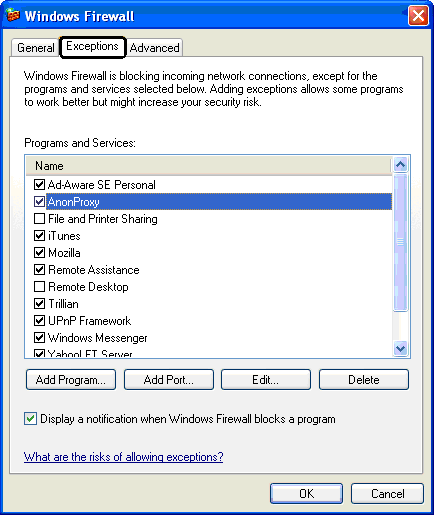
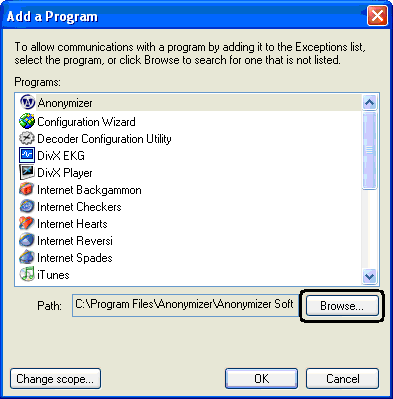
If you do not see Anonymizer in this list, click on Add Program at the bottom left.
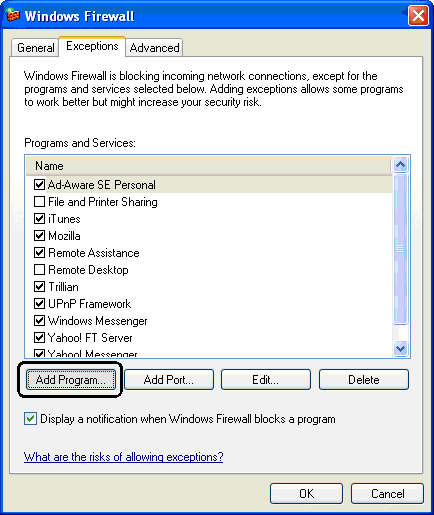
Click on Browse at the bottom right.
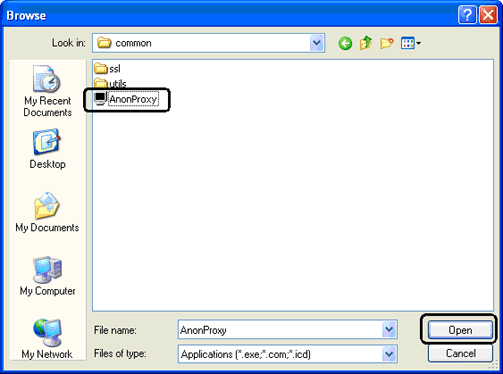
Click on the Look in: pull down, go to your Local Disk C:, Program Files, Anonymizer, Anonymizer Software, Common.
In the Common folder, click on AnonProxy and click 'Open' at the bottom right.
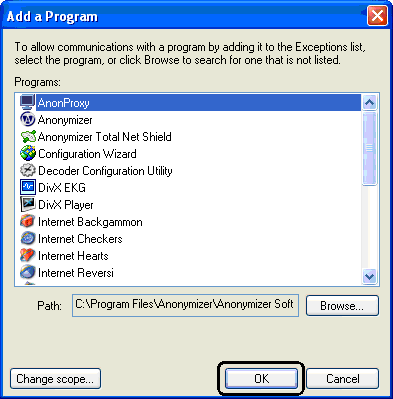
Once added, you will see the Anonymizer applications in the Add a Program window. Highlight ALL Anonymizer's listed and click 'OK'. To get back to this window to add the other applications, click on Add Program from the previous window.
In the Exceptions list, simply put a check next to ALL Anonymizer products listed on this page. Then click 'OK'. You've now added the Anonymizer software to your Windows Firewall.
If you are still having difficulties or you do not see
all of the Anonymizer applications within your firewall
program, please contact Technical
Support.
Back to Top


