Introduction
Anonymizer Nyms allows you to instantly create anonymous email addresses that integrate with your personal email address and protect your identity from spammers. This powerful tool makes it easy to keep your personally identifiable email address off spam lists.
Want to access Nyms online?
Anonymizer Nyms is also available as a Web interface. This is particularly good for people who don't have admin rights on their computers and are unable to install Nyms on their machines. To access Anonymizer Nyms Web version, please log into www.nyms.net with your username and password.
Note: This Help Section is for the Client version of Nyms. If you need assistance with the Web version of Nyms, please visit the Nyms Web Help Page.
To learn more about Anonymizer Nyms, please click one of the links below for more information:
Activating Nyms
Once you have downloaded and installed Anonymizer Nyms, you will need to activate the product to use it. Please follow the next four steps to activate your new product.
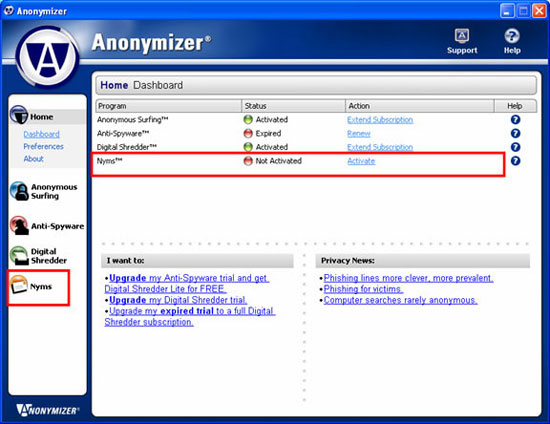
1. You can access the activation screen by either clicking on the "Activate" link at the top of the dashboard or by clicking on the Nyms icon in the left navigation as shown below.
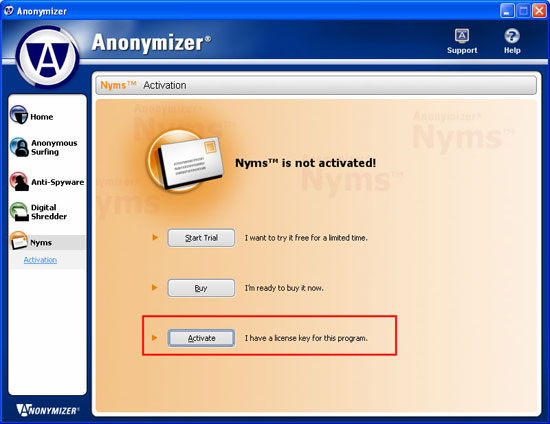
2. Click on the "Activate" button to proceed.
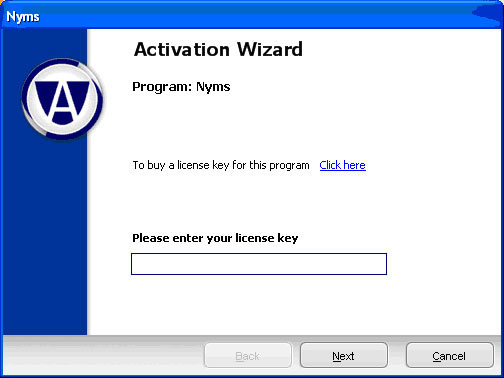
3. The Activation Wizard will open and ask you to enter your license key. This key was provided to you when you downloaded Anonymizer Nyms. Enter your key and press the "Next" button to continue.
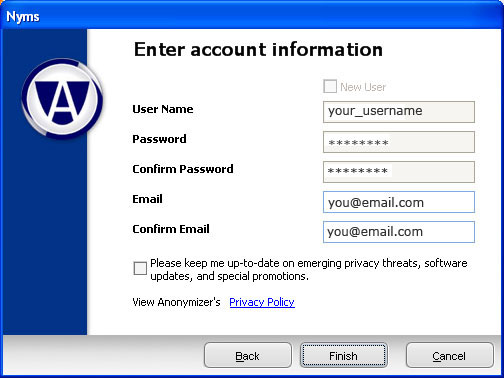
4. If you have purchased Anonymizer software before, your customer information will be pre-populated in the final activation box, as shown below. Please verify this information is up to date and click the "Finish" button. If you are a new customer, please enter your username, password, and email address and click the "Finish" button.
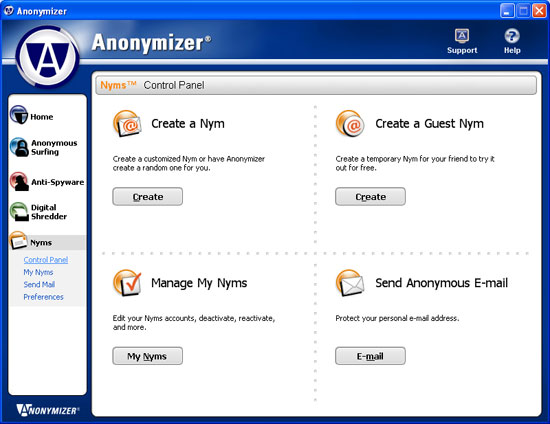
Control Panel - Using Nyms
This is the first screen that you will see when you click on the Nyms icon in
the left navigation. Here you are able access the main
functionality of Nyms, so you can create a new Nym,
create a guest Nym for a friend, manage your current
Nyms, or send anonymous email. Simply click on the
appropriate buttons to go to the next step.
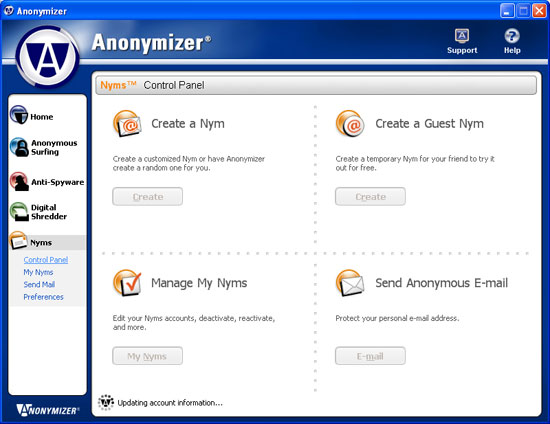
Updating Account Information
You will see this message each time you start Nyms.
This is simply refreshing your Nyms information
from the Anonymizer server and should only take
a few seconds to complete.
*Password Error*
You may see this message if your password is out
of sync with the Nyms server. If this happens, click
the OK button on the dialog box.
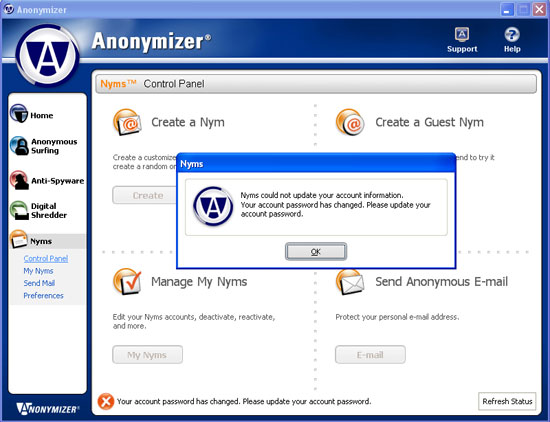
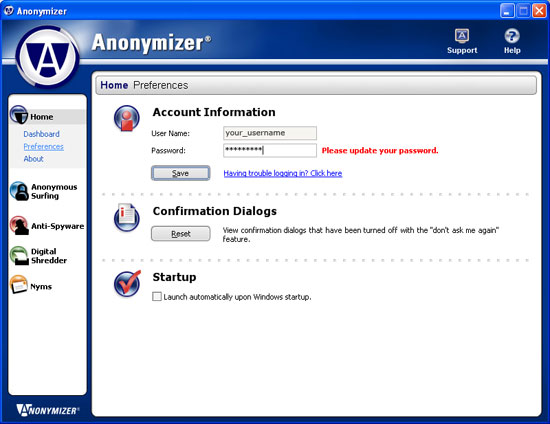
You will be automatically redirected to the Preferences section so you can update your password. Your password should match the password you use to access your account on anonymizer.com.
Create a Nym
This is where you will create your unique Nyms addresses. You can create a custom Nym or have Anonymizer generate a random Nym for you.
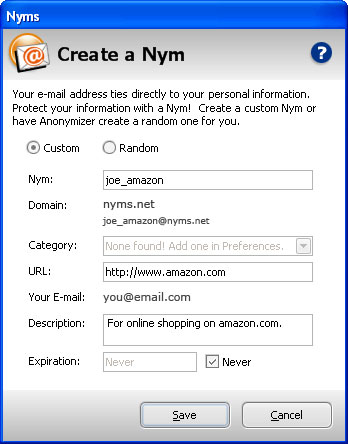
Create a Custom Nym
If you wish to create a custom Nym, simply type
the name you'd like to use (such as joe_amazon to
use for amazon.com). Nyms will automatically add
the domain to the end of your account and it will
appear as you type right below the domain. You can
put your Nym into a category, such as shopping,
news, jokes, etc. You can create new categories
in the Preferences section. You can add a URL if
this Nym is for a specific Web site, such as www.amazon.com.
The e-mail that is listed is the e-mail that is
on file for your Nyms account. This is where your
Nyms communications will be sent. You can also add
a description to help you remember what this Nym
is used for. You can set your expiration date to
expire next week, next year, or never. The choice
is up to you. Just select the specific expiration
date or click the "Never" box to the right. All
of the information that you enter for your new Nym
is editable so you can change it whenever you'd
like. After you click the save button, your custom
Nym will be created and you will see a success message
with your new Nym. You will also receive an email
with this information.
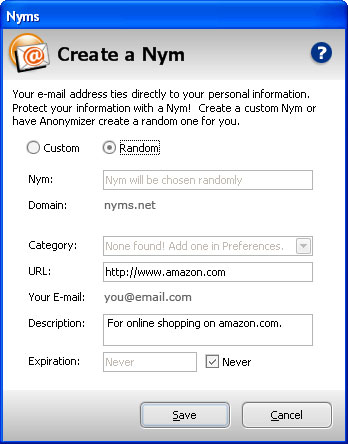
Create a Random Nym
If you would like Anonymizer to generate a random
Nym for you, simply click the Random option and
the Nym box will gray-out with a message that says
a "Nym will be chosen randomly". You can put your
Nym into a category, such as shopping, news, jokes,
etc. You can create new categories in the Preferences
section. You can add a URL if this Nym is for a
specific Web site, such as www.amazon.com. The e-mail
that is listed is the e-mail that is on file for
your Nyms account. This is where your Nyms communications
will be sent. You can also add a description to
help you remember what this Nym is used for. You
can set your expiration date to expire next week,
next year, or never. The choice is up to you. Just
select the specific expiration date or click the
"Never" box to the right. All of the information
that you enter for your new Nym is editable so you
can change it whenever you'd like. After you click
the save button, your random Nym will be generated
and you will see a success message with your new
Nym. You will also receive an email with this information.
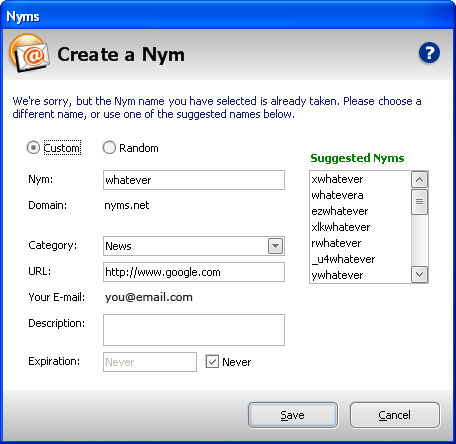
Nyms Already Taken
You may try to create a custom Nym that is already
in use. If this occurs, you will see the message
below with a list of suggested Nyms. You can use
one of the suggestions or try a new Nym altogether.
Clicking the "Cancel" button will close out this
process altogether and a new Nym will not be created.
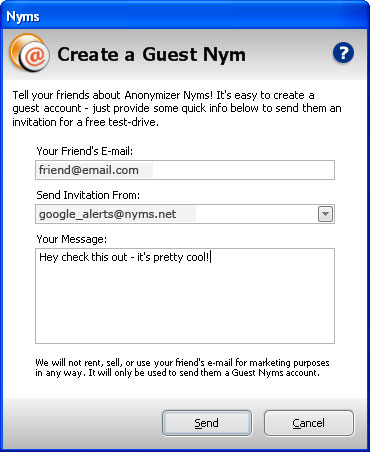
Create a Guest Nym
This functionality will allow you to create a temporary Nym for your friend so they can try it out for free. The invitation to try Anonymizer Nyms will be sent from one of your Nyms accounts. Simply type in your friend's email address, select the Nym account you want it to come from, and type a short message to your friend. When you click the "Send" button, the invitation will be sent to your friend. Their temporary Nym address will not be able to receive messages until they activate the account by clicking on a link in their email. They can also decline the offer to use the free Nym account or they can add their email address to a blacklist so they never receive an invitation from Anonymizer again. Rest assured, we will not share or use their email address for marketing purposes.
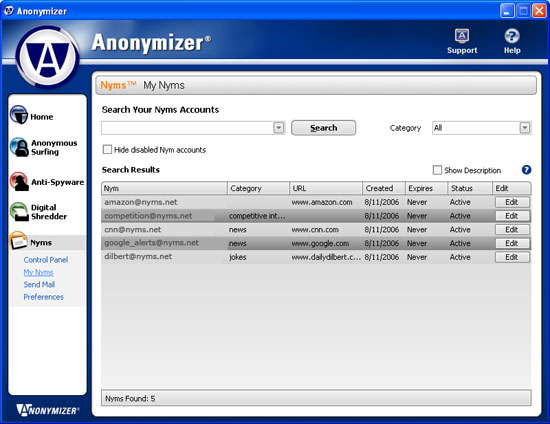
Manage My Nyms
This section will allow you to view all of your Nyms, search for a specific Nym,
edit, or deactivate a Nym. To view only active Nyms
accounts, click the "Hide disabled Nyms accounts" box.
To search by category, select the category from the
drop box and the results from the category will automatically
appear in the list below. To search by keyword, type
the keyword into the text box and click the "Search"
button.
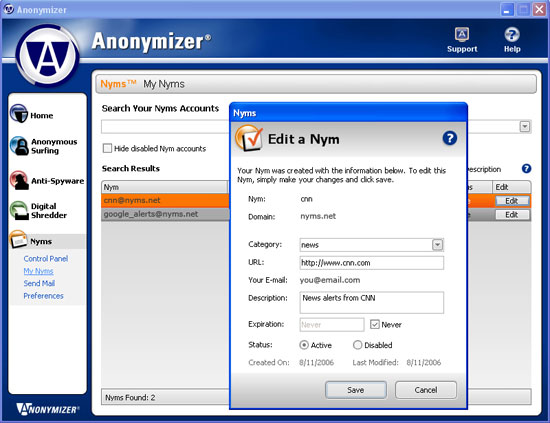
Edit a Nym
To make changes to an existing Nym, click on the edit button for that account. A dialog box will open that will allow you to make any necessary changes and save your edits. If you do not wish to make any changes, simply click the "Cancel" button and it will go back to the previous screen.
You can edit the category, URL, description, expiration date, and the activation status (active or disabled).
Searching Nyms
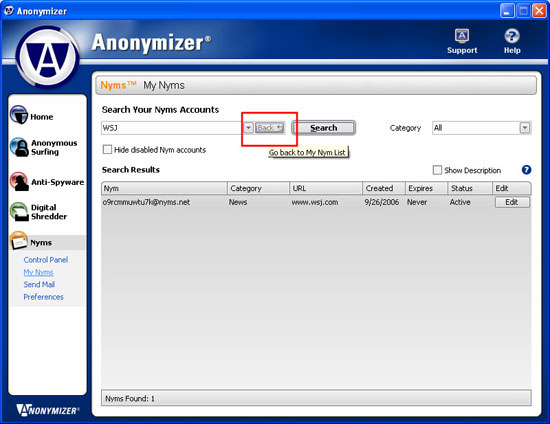
If you have a long list of existing Nyms, you can use the Search functionality to find a particular Nyms account. For example, let's say you are looking for the Nyms account that you setup for the Wall Street Journal but don't want to scroll through your entire list. Simply click on My Nyms, type your keyword (in this case, WSJ) into the search box and click the "Search" button.
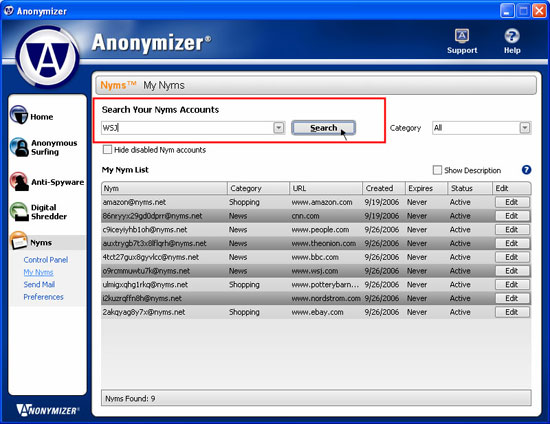
Nyms will go through all of your accounts and list the search results that meet your search criteria in your Nym List as shown below. Note: if you have checked the box that says "Hide disabled Nym accounts" the disabled accounts will not appear in your search. If you can't find a particular Nyms account, try unchecking this box.
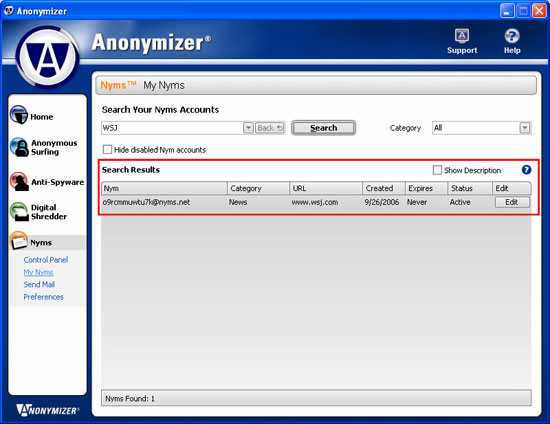
If you wish to undo the search and go back to your full list of Nyms accounts, simply click the "Back" button to the right of the search bar.
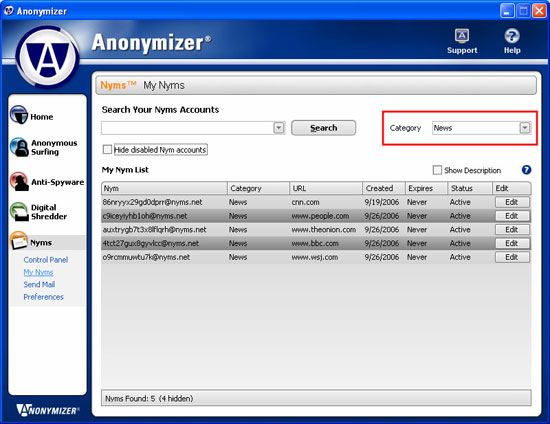
You can also search by category. For example, let's say you wanted to see all of Nyms that you created for your "News" category. Just click the drop down menu and select the category you would like displayed. Note: if you have checked the box that says "Hide disabled Nym accounts" the disabled accounts will not appear in your search. If you can't find a particular Nyms account, try unchecking this box.
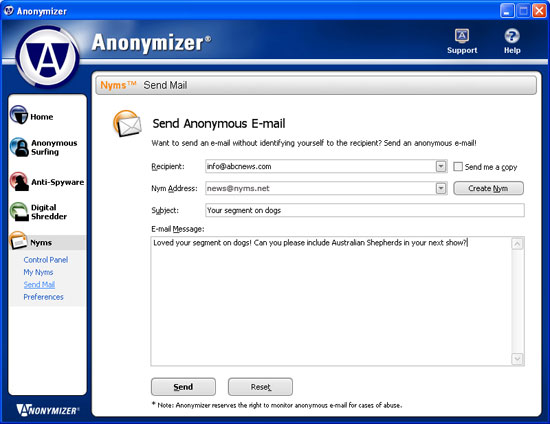
Send Anonymous E-Mail
You can use this to keep your identity private when sending emails. This is a great way to protect your personal email address when sending outbound emails. For example, you may want to comment on an article or request information without revealing who you are. Just select the Nyms account you would like the message to come from, type in the email address the message is going to, and type your email message.
Nyms Preferences
Account Status
By clicking on this box, you will hide all of your disabled Nyms accounts.
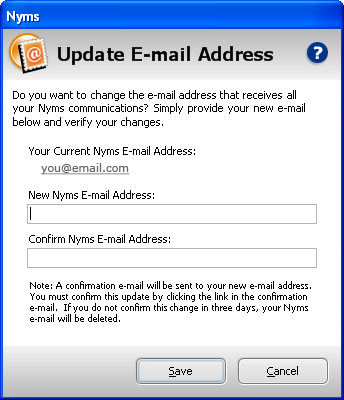
Your Nyms Email Address
This is the email address that Anonymizer has on
file for your Nyms account. All of your Nyms communications
will come to this email address. You can change
this by providing a new email address. Just click
the "Update" button and provide a new email address.
If you do change your email address, an email will
be sent to your NEW account. You must click on the
link provided to approve this change. If you click
the link to deny the change, the account will be
frozen until you go back to this Preferences section
and update the email again.
Your Nyms Email Address
This is the email address that Anonymizer has on file for your Nyms account. All of your Nyms communications will come to this email address. You can change this by providing a new email address. If you do change your email address, an email will be sent to your NEW account. You must click on the link provided to approve this change. If you click the link to deny the change, the account will be frozen until you go back to this Preferences section and update the email again.
Categories
This is where you can create your custom categories
to help manage your Nyms accounts. Some general
categories may be shopping, news, jokes, etc. To
add a new category, simply type it in and click
the "Add" button. To remove an existing category,
simply click on that category and click the "Remove"
button.


